
How I Built Benny: A Production-Hardened AI Assistant for €11/Month
The complete technical blueprint for deploying a secure, 24/7 AI agent on a Hetzner VPS with an 8-layer security stack, Claude Max authentication, and no per-call API charges

Hey Friends 👋 Happy Tuesday
Here’s another weekly dose of AI ways of working.
You’ve seen the demos. AI agents that promise to automate your work, manage your life, and give you back your time. But when it comes to building your own, a critical question emerges: can you trust it? Can you build an AI assistant that has access to your files, your emails, and your private data without creating a massive security hole?
This was the central question I faced when I decided to build Benny, my own 24/7 AI assistant. I wasn’t interested in a toy. I needed a production-hardened agent that could handle real work, securely and reliably. The generic tutorials and superficial security advice I found online weren’t going to cut it. They talked about using a Mac Mini, which didn’t offer the 24/7 uptime I needed, and they glossed over the real security risks.
This post is the authentic story of how I built Benny. It’s a detailed account of the technical decisions, the security architecture, and the real-world trade-offs I made to create a powerful and trustworthy AI assistant. I’m sharing my entire process, from choosing the right infrastructure to implementing a multi-layered security stack, so you can build your own production-ready agent with confidence.
Why a VPS? The Foundation of a 24/7 Agent
My first major decision was choosing the right infrastructure. While many guides suggest using a local machine like a Mac Mini, I quickly realised that this approach wouldn’t meet my requirements for a production-ready agent. I needed a solution that offered 24/7 uptime, data isolation, and a predictable cost structure. After careful consideration, I chose to deploy Benny on a Hetzner CPX32 Virtual Private Server (VPS) with 8GB RAM, running Ubuntu 24.04.
Here’s a breakdown of my decision-making process:
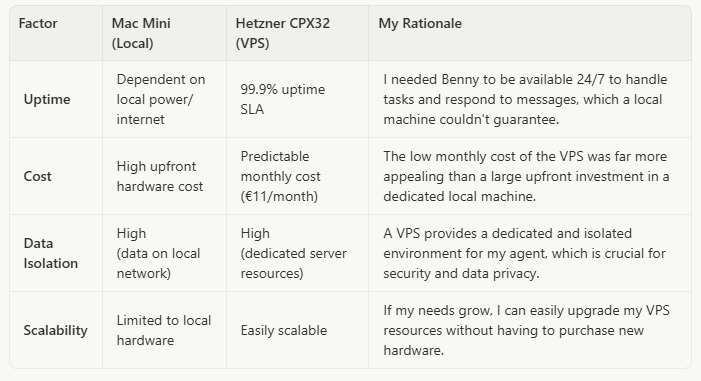
For a total cost of around €11 per month, the Hetzner VPS provided the perfect balance of performance, reliability, and cost-effectiveness for a production-hardened AI assistant. It gave me a solid foundation to build upon, with the confidence that Benny would always be online and ready to work.
The Security Stack: A Multi-Layered Defence
With the infrastructure in place, my next focus was building a robust security stack. A single security measure is not enough. You need a multi-layered defence to protect your agent from various threats. Here’s the security architecture I implemented for Benny:
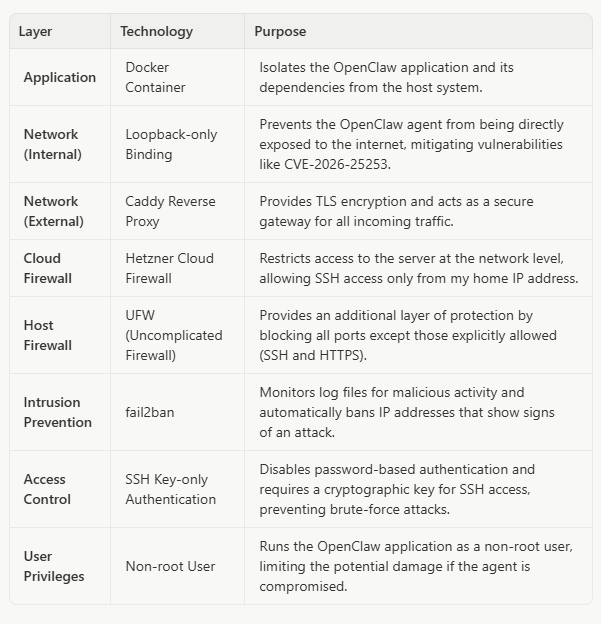

Complete security architecture for Benny on Hetzner CPX32: Cloud Firewall → UFW → Caddy TLS → Docker → OpenClaw loopback binding
This multi-layered approach ensures that Benny is protected at every level, from the application itself to the underlying infrastructure. The loopback-only binding is particularly important. It ensures that the OpenClaw agent is only accessible from the local machine, and not directly from the internet. This is a critical mitigation for vulnerabilities like CVE-2026-25253, which could allow an attacker to gain control of your agent if it’s directly exposed.

Reference architecture illustrating Docker container security principles for application isolation
The Caddy reverse proxy handles all external traffic, providing automatic TLS encryption and acting as a secure gateway. This means that all communication with Benny is encrypted, protecting sensitive data from eavesdropping.
Authentication: Leveraging Your Existing Claude Subscription
My next decision was how to authenticate with the language model. While the OpenClaw documentation often highlights using an API key, I made a deliberate choice to use the setup-token method with my Claude Max subscription. This approach has two significant advantages:
1.No API Billing: By using my existing Claude Max subscription, I avoid any additional API costs. All my agent’s interactions with the model are covered by my subscription.
2.Simplified Credential Management: The setup-token method generates a long-lived token that is easy to manage and rotate. It’s a more secure approach than hardcoding an API key in a configuration file.
Here’s how I set it up:
First, I generated a token on the VPS using the Claude Code CLI:

Then, I pasted the token into OpenClaw:
This command stores the authentication token in the ~/.openclaw/agents/<agentId>/agent/auth-profiles.json file, which OpenClaw uses to authenticate with the Anthropic API. This approach is not only more secure but also more cost-effective, as it allows me to leverage my existing investment in a Claude Max subscription. Note that the setup-token requires periodic renewal, so you’ll need to regenerate and update it when it expires to avoid authentication failures.
The Nitty-Gritty: Real-World Technical Decisions
Beyond the high-level architecture, building a production-ready agent involves a series of smaller, but equally important, technical decisions. Here are some of the key choices I made during the build process:
Telegram as the Interface: I chose Telegram as the primary interface for interacting with Benny. It’s fast, reliable, and has a robust bot API that makes it easy to integrate with OpenClaw. This allows me to send commands, receive updates, and interact with my agent from anywhere, on any device. The setup was straightforward: I created a new bot using BotFather, obtained the bot token, and configured OpenClaw to use it.
Brave Search Integration: For web search capabilities, I integrated Brave Search. It offers a privacy-focused alternative to Google and provides high-quality search results without the tracking. This aligns with my overall security-first approach and ensures that my agent’s search queries aren’t being logged or monetised by a third party.
No ClawHub Skills: I made a deliberate decision to use custom skills only, avoiding the community ClawHub repository. Independent security audits by Bitdefender and Cisco have documented a 17-26% vulnerability rate in community skills. For a production-hardened agent, this risk was unacceptable. Building custom skills takes more time upfront, but it ensures that every capability Benny has is vetted and secure.
CVE-2026-25253 Mitigation: During my research, I discovered a critical vulnerability (CVE-2026-25253) that affects OpenClaw instances that are directly exposed to the internet. By implementing loopback-only binding and using a reverse proxy, I ensured that Benny is protected from this vulnerability. This is a perfect example of why a security-first approach is essential when building AI agents.
These seemingly small decisions have a significant impact on the usability, security, and reliability of the agent. They are the details that separate a toy project from a production-ready tool.
What You’ve Built: A Foundation for Autonomous Work
By following this guide, you haven’t just built an AI assistant. You’ve built a production-hardened platform for autonomous work. You have a secure, reliable, and cost-effective system that can serve as the foundation for a wide range of automation tasks. You’ve learned how to think critically about AI security, how to design a multi-layered defence, and how to make real-world technical decisions that balance security, cost, and performance.
This is more than just a chatbot. It’s a digital employee that you can trust with real work. It’s a platform that you can extend and adapt to meet your specific needs. And it’s a testament to the power of a security-first approach to AI.
What’s Next: From Deployment to Reliable Behaviour
This article covers the infrastructure and security foundation. But deploying the agent is only half the battle — the real challenge is making it reliably useful. In upcoming posts, I’ll cover the workspace and memory architecture that prevents your agent from becoming a “goldfish brain” after two weeks, and the iterative behaviour design process that turns a deployed agent into a trustworthy digital team member. Building the infrastructure is the easy part. Teaching it to think like you is where the real work begins.
Conclusion: The Concrete Outcome
I built a production-hardened AI assistant for €11 per month on a Hetzner CPX32 VPS with an 8-layer security stack: Cloud Firewall, UFW, fail2ban, SSH hardening, Caddy TLS, Docker isolation, loopback binding, and non-root execution. Authentication runs through my existing Claude Max subscription via setup-token, avoiding API billing entirely. The agent operates 24/7 with 99.9% uptime, accessible via Telegram from anywhere.
Total monthly cost: €11 for the VPS, plus the Claude Max subscription you likely already have. No additional API charges. No expensive hardware. No compromises on security. That’s the concrete takeaway: you can build a trustworthy AI assistant without breaking the bank or sacrificing your data privacy.
Until the next one!
Andres